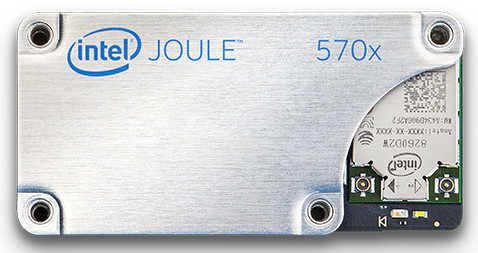
The Intel Joule has been released. Yesterday, Intel made a announcement that took the maker community by surprise. The Joule is a extremely feature dense board which really packs a punch. But does it stand up to the venerable Raspberry Pi which is seems to want to directly compete with? Is it even worth it's price tag? These are some really good questions I will be addressing in this post.
Specs
First things first. Before we even take a closer look at the new board, let's first analyze the specifications of the board.
The Intel Joule is available in two separate models, the 570x and the 550x and both of them have impressive specs which beats anything I've seen in that kind of a compact platform before.
The Intel Joule 570x module features:
- High-performance, 64-bit, 1.7 GHz quad-core Intel® Atom™ T5700 processor with burst up to 2.4 GHz
- 4GB LPDDR4 RAM and 16GB eMMC memory
- Intel® HD Graphics with 4K video capture and display
- 802.11ac Wi-Fi with MIMO and Bluetooth 4.1
- USB 3.0, MPI CSI a
AngelHack is an annual hackathon organised on the international level with winners from each country competing with each other internationally. It attracts attention from all over the world and takes its place as one of the more well-known hackathons in Singapore. In addition, they have awesome prizes ranging from sponsor prizes to a free inclusion into their Hackcelerator program for startups.
This year AngelHack was held at the Hub which is a coworking space in Singapore. Although the chosen location was very well outiftted for the hackathon with all the necessary facilities requires and it provided the ideal environment for hacking and working, it was a bit too cramp for everyone and the size of the location could definitely have been bigger. However, that was not much of a problem as once we started working on our project we really couldn't be bothered with petty details like that. The Hub also provided cups and glass bottles of water.
For the first 3 hours, we spent our time think
This is the post zero in a series of posts about the KSP control station we have been working on for a while now. This project got its beginnings back when we were preparing for Maker Faire Singapore 2016 where we wanted to make something big. Something that people would see from across the room and go "Wow!".
So in the end, we came up with the KerbalKontrol V1.0 which was quite successful and attracted a lot of attention at Maker Faire. In addition, it also got some love from the Reddit and Hackaday community! The response was some of the best we have had since we launched and motivated by that very response we decided to launch this series.
In this series, we will be re-doing the whole project again in a less rushed manner than it was done before and iron out all the quirks and the problems we had before, both software and hardware. We will also be starting a Gitlab repo for this and publicly sharing all our design files with the community so if you are interested in making
When messing with screen blending, I came across a bug in Chrome and Firefox when using screen blending with transform animations. Surprisingly, Safari rendered it right.
This is when you get when applying mix-blending-mode: screen; on an <img> with position: absolute;, so as to stack it on another element. Of course, this doesn't work in Edge.
See the Pen Screen Blending: Without animation by Ambrose Chua (@ambc) on CodePen.
When applying an animation on the <img> element, this is what you would get in your current browser:
See the Pen Screen Blending: With animation by Ambrose Chua (@ambc) on CodePen.
Hey, what's going on here?
When using CSS animations, browsers switch to GPU acceleration to provide smooth animations. But when using GPU acceleration, transparent backgrounds are "lost", and the renderer interprets background-color: transparent; as black. Since we are using mix-blend-mode: screen; where black is used to make cutouts, the whole area on the page
This post is a bit delayed, but Oshstencils, my goto solder stencil supplier, has recently revamped their website along with adding stainless steel stencils!
I was really excited about the new stainless steel stencils option as I have never actualy used stainless steel stencils before and as far as I knew, they were more reliable and durable compared to kapton Polyamide.So of course, I went out and ordered a set of stainless steel stencils for my EdiCopter PCB board. In this post, I will be comparing stainless steel stencils to the classic Kapton polyamide ones.
Benefits
The main benefit of stainless steel over Kapton polyamide is the durability. This can be seen from the rated usage cycle where stainless steel is rated for many times more usage compared to the Kapton polyamide counterpart. Another benefit for me personally is the stiffness which al
First, some history!
I started off my sysadmin adventures back in 2012. After learning Python, PHP and web for one and a half years, I discovered Node.js. Back then, there was quite a bit of media hype on Node.js and it's potentials. Having stronger JavaScript experience and used to the event-driven style of writing code, I picked it up in a breeze.
Now, that was at the age of 12 and I had no credit card, neither did I know of any free VPSes, nor could I explain to my parents what a VPS was. I had been using 000webhost to run a couple of sites written in PHP or static HTML, but I wanted to host Node.js apps.
I had a laptop. Or rather, I shared a family laptop, but no one else uses it so I had Ubuntu installed on the HP520 (with a long backstory on how I accidentally switched to Ubuntu). My home network was a "3G WiFi Router" that had horrible reception issues and was unstable, so I switched to a USB dongle attached to my laptop, and left my laptop on its side on my desk.
So t
Autodesk bought Eagle! If you haven't been living under a rock for the past week, you would have heard the news that Eagle was sold to Autodesk by farnell/element14. How do I feel about it? Well, that's what I'll be talking about in this post.
First reaction
The first reaction I had to this piece of news when I heard it was to think that that was awesome! I'm sure most of you who read my posts know I'm a hardcore Autodesk fan and the fact that Eagle is now run by Autodesk just gave me more reason to move to it (aside from the bountiful libraries). So, in short, I was quite excited about it.
Some time later...
So I gave it more thought as I contemplated switching from my daily driver software KiCad to Eagle. Then Adafruit released this awesome interview with Autodesk about their new purchase. It seemed to indicate that Autodesk will be making incremental updates to the Eagle software. I hope they improve on the UX a bit more and stuff but all that is going to take time.
KiCad vs Autodes
The second ever full fledged Maker Faire has made its pass this year and it was a really productive and enriching experience. We as MakerForce did have a booth there and we all had a lot of fun. In this post, I will be talking about the Maker Faire experience in Singapore , our booth and the interesting people we met there.
The Maker Culture
I've got to say that the maker culture in Singapore is increasing rapidly. Just 3 years ago, there were just 1 hall full of booths. This year, there was at least 3 halls full of fun and creativity. From pneumatic musical instruments to escape rooms, this year's Maker Faire was overflowing with awesomeness. Also, this year's Maker Faire was held in in the SUTD campus, which gives me a good excuse to check out SUTD as a future university.
Personally, this is my 4th Maker Faire I've been to and the 2nd Maker Faire I've had a b
Part 1: Toaster
Part 2: Electronics
Part 3: Software
Part 4: Conclusion
So it has been a while and I've been using the solder reflow oven for a while now. For the past weeks, I've been experimenting with finer and finer pitch components and I've been having really good progress so far.
The reflow oven performs way better than what I expected as it has fairly even heating through the oven and can solder super fine pitch components. One such example is the edison or hirose 70 pin connector. Despite the 0.5mm pin pitch my reflow oven managed to perfectly reflow the connector countless times.
So having said that, I think there are still a few software bugs that plagu
As some of you might know, I am a regular AutoDesk Inventor user. I do a lot of my projects using AutoDesk Inventor and I really enjoy the user experience crafted by the guys over at AutoDesk. So, we were at Maker Faire Singapore last weekend and I was looking at the AutoDesk booth. They were showing off their new software—Fusion 360. And I was completely blown away. After a really long look at its UI and the features it offers, I was bought over. I decided to switch to Fusion 360 to check it out and I thought I should write a comparison between Fusion 360 and Inventor.
Basic features
Before we start a full on comparison, let's take a quick look at what Fusion 360 has to offer. Fusion 360 is the all encompassing software. It integrates 3D CAD, CAM and CAE software into one big user-friendly bundle. This means that you can design your product, simulate or render it and provide 2D drawing files all from a single application. In addition, it also has both free form and parametric method
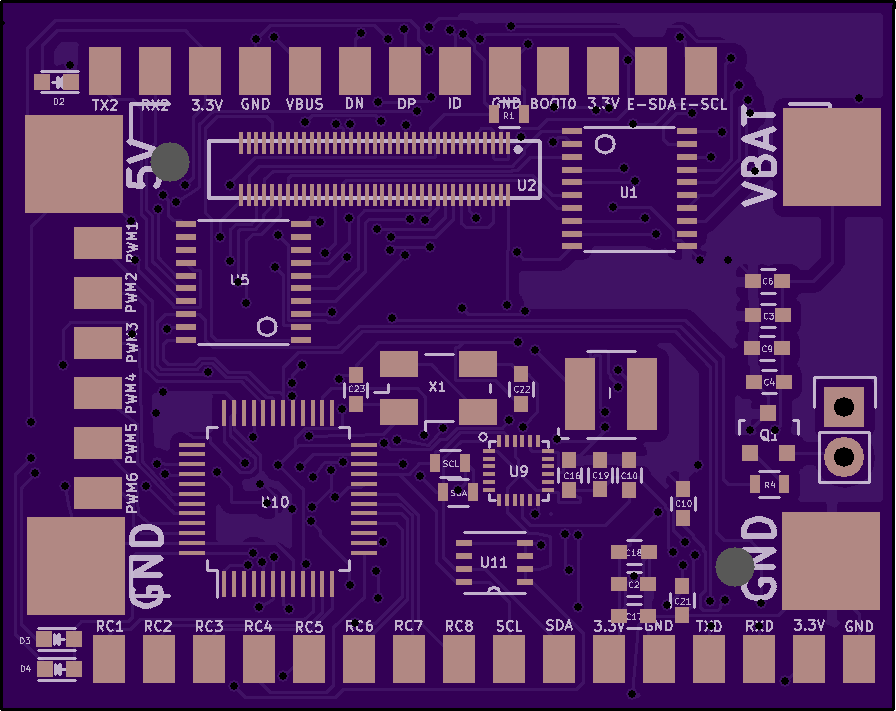
The EdiCopter board is back and its better than ever. The EdiCopter board has seen several revision since I last posted on it but today I'm releasing the second public revision of the EdiCopter Board. It employs the use of SMD components and optimizes the space in the PCB to better use the area and make it smaller.
![]()
Improvements
I have made several improvements to the board since last time. One of the more significant changes is the fact that the components are more evenly distributed between the top and bottom of the PCB. There is also proper silkscreen labeling of the PCB.
The size of the PCB has also shrunk by almost half. This makes it easier to mount them on the SentiBot and also allows for us to make the SentiBot smaller.
Solder Reflowing
I will be reflowing this PCB in my new custom reflow oven. I also had bought the OSHStencil stencil for reflowing. I will be posting a follow up talking about how the reflow oven performs soon.
I have been playing Kerbal Space Program on/off for a few years now, ever since the 0.23.5 update. The game came of out of Steam Early Access last year and the recent update 1.1 upgraded the game engine to Unity 5, improving the multi-threading of the physics processing. And so when we were coming up with ideas to do for MakerFaire 2016, I suggested building a custom KSP controller.
There already have been numerous projects done by others in the KSP community. These are documented across the KSP forums, and the KSP subreddit. These mainly involve integrating a joystick into a platform together with a few buttons and switches that are essential to flying a rocket in KSP. Ambrose, however, had not seen these, and designed what is essentially a command station with inspiration from the NASA mission control stations.
The overkill command station is born
The middle section holds a 27 inch monitor, joystick and buttons on the bottom panels, and more switches and lights on the top panel. Eve